So my husband and I have decided that using disposable diapers is FAR to expensive. We spend roughly $40 to $60 a month on diapers. So we decided to order some flat cloth diapers. $14.95/dozen @ Cotton Babies. We ordered 2 dozen and 3 covers to start out with. 3 covers isn't enough but we will just have to make do.
My mother-in-law being the awesome woman she is, decided that she wanted me to make some so she bought me some flannel instead of diaper fabric. This was fine since you can only make one diaper out a yard of the diaper fabric and its friggin $4.99 a yard!!!
This makes the diapers a bit thicker but are way better for overnight. Much more absorbent. Especially if you can make a liner out of something that wicks the moisture away from babies skin so he/she doesn't feel it as much. I also had a little PUL laying around, enough to make a diaper cover so now I've got an additional 9 diapers and an extra cover.
SOOOOOOO to make your own.....
Buy flannel or diaper fabric. Diaper Cuts has a selection of fabrics and PUL for diaper making as well as mama pad making.
I make my flats about 30"x30" which will accommodate most babies. Newborns need a 27"x27" flat where as larger babies (usually 24months +) need a 33"-34" flat.
Determine how many diapers you want to make. Multiply it by the length of your diaper, in this case 30". Divide that number by 36 and you will get how many yards you will need. You will have about a foot of spare cloth. I used this to make additional soakers to go under my Birdseye flats.
Once you have washed and dried your fabric, iron, measure and cut.
Fold edges over about half an inch. I don't iron or pin them. I just rough estimate it. I mean come on now, they are just going to get covered in poo... Do they really have to be perfect?
Once edges are folded zig-zag the edge so that it doesn't unravel. Back stitch at beginning and end so thread doesn't come undone and Voila! Diapers! Your little one will thank you. Flannel is much nicer to their backside!
Kloe

My Sleeping Angel
Showing posts with label Tutorial. Show all posts
Showing posts with label Tutorial. Show all posts
Saturday, July 17, 2010

Friday, July 2, 2010
Leggy Warmers
I saw a few tuts on how to turn old socks/legwarmers into baby legwarmers. This is what they look like. Super Cute. I love them! You can find a tut here. It isn't exactly the same cuz I do what I want and they wouldn't have fit my little girl.


Wednesday, June 30, 2010
Sourdough Bread Recipe from Nourishing Traditions
Makes 1 large loaf or 2 to 3 small loaves.
2 2/3c. Sourdough Starter (which I will list at the end of this post.)
4 1/4c. freshly ground spelt, kamut, or hard winter wheat
1t. coarse sea salt
1/2c. cold filtered water

Traditional sourdough bread, prepared with a started rather then with yeast, has a delicious flavor but tends to be heavy for modern tastes. Spelt gives the most satisfactory loaf.
Your starter should be at room temp. and have gone through the bubblng, frothy stage.
Place starter, salt and water in a large bowl and mix with a wooden spoon until the salt crystals have dissolved. Slowly mix in the flour.


Towards the end you will find it easier to mix with your hands. You my add a few more tablespoons of water if the dough becomes too thick. It should be rather soft and easy to work with. Knead by pull and folding over, right in the bowl, for 10 to 15 minutes; or knead in batches in your food processor.


Without pressing down on the dough, cut or shape loaves into desired shapes or place into a large well buttered loaf pan.

Cut a few slits in the top of the dough, cover & let rise from 4 to 12 hours, depending on the temperature.
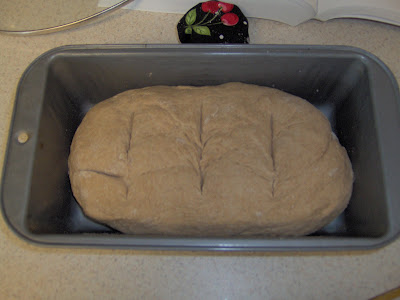
Bake at 350 degrees for about an hour. Allow to cool before slicing. The bread will keep for up to a week without refrigeration.
Voila!

Sourdough Starter from Nourishing Traditions
Makes about 3 quarts
2c. freshly ground rye flour
2c. cold filtered water
cheesecloth
6c. freshly ground rye flour
cold filtered water
Best results for sourdough started are obtained from rye rather then wheat flour, perhaps because rye contains a lower phytate content then wheat. You will need two gallon-sized bowls. Total time to make starter is one week.
Grind 2 cups flour and let it sit for a bit to cool. In one large bowl, mix flour with 2 cups of cold water. The mixture should be quite soupy. Cover with a double layer of cheesecloth secured with a rubber band---this will allow yeasts and bacteria to get in but will keep insects out. In warm weather, you may set the bowl outside in the shade if you live in an unpopulated are and no pesticides have been used in your garden. Otherwise keep it in a warm open area indoors or on a patio.
The next day and every day for a total of 7 days, transfer the started to another clean bowl and add 1 cup freshly ground rye flour plus enough could water to make a soupy mixture. (in my experience this is about 3/4c.) Cover and let stand. After a few days the started will begin to bubble and develop a wine like aroma. It should go through a bubble, frothy stage and then subside. After 7 days, the started is ready for breadmaking. Use as much as needed to make your bread and save at least 1 quart for your next batch of starter. If not using remaining starter immediately, you may store it in airtight jars in the fridge or freezer. (I suggest the fridge.)
Do not be tempted to add honey to your starter, as some recipes require. Honey encourages the proliferation of yeasts at the expense of lactic-acid producing bacteria and may give you an alcoholic fermentation. To make a new batch of starter, place the quart of leftover starter in a clean bowl. Add 1 cup freshly ground rye flour plus water each day, changing bowls until 3 quarts are obtained.
2 2/3c. Sourdough Starter (which I will list at the end of this post.)
4 1/4c. freshly ground spelt, kamut, or hard winter wheat
1t. coarse sea salt
1/2c. cold filtered water

Traditional sourdough bread, prepared with a started rather then with yeast, has a delicious flavor but tends to be heavy for modern tastes. Spelt gives the most satisfactory loaf.
Your starter should be at room temp. and have gone through the bubblng, frothy stage.
Place starter, salt and water in a large bowl and mix with a wooden spoon until the salt crystals have dissolved. Slowly mix in the flour.


Towards the end you will find it easier to mix with your hands. You my add a few more tablespoons of water if the dough becomes too thick. It should be rather soft and easy to work with. Knead by pull and folding over, right in the bowl, for 10 to 15 minutes; or knead in batches in your food processor.


Without pressing down on the dough, cut or shape loaves into desired shapes or place into a large well buttered loaf pan.

Cut a few slits in the top of the dough, cover & let rise from 4 to 12 hours, depending on the temperature.

Bake at 350 degrees for about an hour. Allow to cool before slicing. The bread will keep for up to a week without refrigeration.
Voila!

Sourdough Starter from Nourishing Traditions
Makes about 3 quarts
2c. freshly ground rye flour
2c. cold filtered water
cheesecloth
6c. freshly ground rye flour
cold filtered water
Best results for sourdough started are obtained from rye rather then wheat flour, perhaps because rye contains a lower phytate content then wheat. You will need two gallon-sized bowls. Total time to make starter is one week.
Grind 2 cups flour and let it sit for a bit to cool. In one large bowl, mix flour with 2 cups of cold water. The mixture should be quite soupy. Cover with a double layer of cheesecloth secured with a rubber band---this will allow yeasts and bacteria to get in but will keep insects out. In warm weather, you may set the bowl outside in the shade if you live in an unpopulated are and no pesticides have been used in your garden. Otherwise keep it in a warm open area indoors or on a patio.
The next day and every day for a total of 7 days, transfer the started to another clean bowl and add 1 cup freshly ground rye flour plus enough could water to make a soupy mixture. (in my experience this is about 3/4c.) Cover and let stand. After a few days the started will begin to bubble and develop a wine like aroma. It should go through a bubble, frothy stage and then subside. After 7 days, the started is ready for breadmaking. Use as much as needed to make your bread and save at least 1 quart for your next batch of starter. If not using remaining starter immediately, you may store it in airtight jars in the fridge or freezer. (I suggest the fridge.)
Do not be tempted to add honey to your starter, as some recipes require. Honey encourages the proliferation of yeasts at the expense of lactic-acid producing bacteria and may give you an alcoholic fermentation. To make a new batch of starter, place the quart of leftover starter in a clean bowl. Add 1 cup freshly ground rye flour plus water each day, changing bowls until 3 quarts are obtained.
Tampon/Pad Cozy, Boxy Little Bags
As I am sure most women know, you don't generally have a period while breastfeeding however I still wanted to make some of these super cute feminine product holders for the future.
Tampon/Pad cozy tut here.


Tampon Cozy tut here.

Little Boxy Bag tut here.
 I chose to cover my bags in vinyl. In retrospect, I think that I should have lined the inside with vinyl since I have on in Cherry fabric in my diapie bag for Kloe's ointments and meds.
Happy Sewing!
Tampon/Pad cozy tut here.


Tampon Cozy tut here.

Little Boxy Bag tut here.

Happy Sewing!
Diaper Clutch/Burpies


Baby/Toddler Yoga Pants
I am going to be making most of my baby girls clothing from here on out. Here is my first experience with making some clothing for her...


You can find the pattern and tut here.


You can find the pattern and tut here.
Zippered Wallet
My very first zippered project! I got a little intimidated. It doesn't look great but that's ok. it just hangs out in my purse. Here is the tut from SewChristine.


The Buttercup Purse
The Buttercup Purse by Rae is one of the very first things I made after I made the wipes. Here is what it ended up looking like....

The purse was incredibly simple to sew and I love how cute it looks. Hers look much better of course! You can find the tut on how to do it here.
Happy Sewing!

The purse was incredibly simple to sew and I love how cute it looks. Hers look much better of course! You can find the tut on how to do it here.
Happy Sewing!
First Post. Hello, hello!
So at some point in late May or early June, I wanted to make some cloth baby wipes for my little girl. At the time I didn't have a sewing machine so I went to my grandmother's house to use hers. It looks something like this...

With it I made little wipeys that looked like this....

After doing so my grandma decided it was time for me to have my own machine and found one on Craigslist for $50. I drove over to her house and picked up the cash as well as the ad and directions to the ladies house who was selling the machine. When I arrived, I discovered that her concept of barely used and what barely used really means were two very different things. She spoke very little English but informed me that she didn't know how to use it but that it was brand new. I had to clean tons of fabric dust out of it and oil it. New my butt.
It looked a little something like this.... (but a bit dirtier. I don't have a pic of the machine except from angles.)

This is what it really looks like. I added the rose :)

It doesn't have any fancy stitches, just forward, backward, zig-zag and a button hole setting but it gets the job done!
When I got my machine home, I proceeded to make more wipes as well as many other things that I will be posting today.
Thanks for reading! Enjoy!


With it I made little wipeys that looked like this....

After doing so my grandma decided it was time for me to have my own machine and found one on Craigslist for $50. I drove over to her house and picked up the cash as well as the ad and directions to the ladies house who was selling the machine. When I arrived, I discovered that her concept of barely used and what barely used really means were two very different things. She spoke very little English but informed me that she didn't know how to use it but that it was brand new. I had to clean tons of fabric dust out of it and oil it. New my butt.
It looked a little something like this.... (but a bit dirtier. I don't have a pic of the machine except from angles.)

This is what it really looks like. I added the rose :)

It doesn't have any fancy stitches, just forward, backward, zig-zag and a button hole setting but it gets the job done!
When I got my machine home, I proceeded to make more wipes as well as many other things that I will be posting today.
Thanks for reading! Enjoy!


Subscribe to:
Posts (Atom)